Power suddenly cutting out in one part of the house can feel confusing, especially when everything else seems fine. Learning how to replace a circuit breaker gave a clear path to fix the issue without panic. Instead of relying on trial and error, understanding the right steps made the process safer and far more predictable for everyday home maintenance.
Why Circuit Breakers Fail Over Time
Circuit breakers are designed to protect your home, especially during power outage situations but they are not immune to wear and tear. Over time, repeated electrical stress reduces their effectiveness, making replacement necessary for safety and performance.
Overload And Frequent Tripping
One of the most common reasons for failure is repeated overloading. When a breaker trips often, its internal mechanism weakens, eventually losing its ability to reset properly and protect the circuit.
Short Circuits And Internal Damage
Short circuits create intense heat and stress inside the breaker. Even if the damage is not visible, it can reduce reliability and increase the risk of electrical hazard during critical moments.
Age And Wear
Older electrical panels naturally degrade over time. As components age, they become less efficient and more prone to malfunction, especially in homes with increasing power demands.
Signs You Need Replace a Circuit Breaker
Recognizing early warning signs can prevent serious electrical issues. These indicators often show up before complete failure and should not be ignored.
Breaker Won’t Stay Reset
A breaker that trips immediately after being reset is a strong sign of internal failure. This usually means the breaker can no longer handle normal electrical loads.
Burning Smell Or Heat
A noticeable burning odor or heat coming from the panel indicates overheating. This is a serious issue that requires immediate attention to avoid fire hazards.
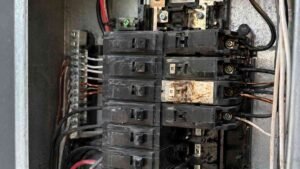
Visible Damage
Cracks, discoloration, or loose connections are clear signs that the breaker is no longer safe. Physical damage should always lead to replacement rather than temporary fixes.
Preparation And Safety Before You Replace
Taking time to prepare properly makes the entire process safer and more efficient. Safety is always the top priority when working with electrical systems.
Choose The Correct Replacement Breaker
Always match the brand, type, and amperage of the existing breaker. Using the wrong breaker can lead to compatibility issues and increase the risk of electrical faults.
Gather Essential Tools
Basic tools such as an insulated screwdriver, a non contact voltage tester, and a flashlight are necessary. These tools help ensure accuracy and reduce risk during the process.
Follow Safety Precautions
Stand on a dry surface like a rubber mat or plywood and wear insulated gloves. Even after turning off the main power, some parts of the panel may still carry current.
How To Replace a Circuit Breaker Step By Step
Following the correct sequence ensures both safety and effectiveness during the replacement process.
- The first and most important step in how to replace a circuit breaker is turning off the main power supply at the electrical panel. This cuts off electricity to most circuits and creates an electrical safe working environment.
- Once the power is off, remove the panel cover carefully by unscrewing it and lifting it away, keeping in mind that some internal parts may still remain live.
- After opening the panel, use a voltage tester to confirm there is no electricity flowing to the breaker you plan to replace. This step is essential and should never be skipped.
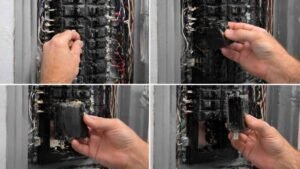
- Once confirmed, loosen the terminal screw on the faulty breaker and gently pull the connected wire out.
- Next, remove the old breaker by gripping it near the center of the panel and rocking it outward until it snaps off the bus bar. Take the new breaker, ensure it is in the off position, and install it by hooking the back into place and pressing the front until it clicks securely.
- Reconnect the wire by inserting it into the terminal and tightening it firmly. After everything is secure, reattach the panel cover. Turn the main power back on and switch the new breaker to the on position to test if the circuit is functioning properly.
Common Mistakes To Avoid During Replacement
Avoiding common mistakes can make a big difference in both safety and performance. Even small errors can lead to long term issues.
Using The Wrong Breaker Type
Not all breakers are interchangeable. Using an incorrect type or amperage can cause poor performance and increase the risk of overheating or failure.
Skipping Voltage Testing
Assuming the power is off without testing can be dangerous. A voltage tester confirms safety and prevents accidental contact with live wires.
Loose Or Improper Connections
Failing to tighten the wire securely can lead to overheating and unreliable operation. Proper connections ensure consistent electrical flow.
What If Problems Continue After Replacement
Sometimes replacing the breaker does not fully resolve the issue. Understanding why helps avoid repeated failures.

Hidden Wiring Issues
Faulty wiring within the walls can cause breakers to trip repeatedly. In such cases, the problem lies deeper than the breaker itself.
Overloaded Circuits
Too many devices connected to one circuit can cause continuous tripping. Reducing the load or redistributing appliances may solve the issue.
Appliance Faults
A defective appliance can trigger breaker trips even after replacement. Identifying and repairing the faulty device is essential.
When To Call A Professional Electrician
Some situations are best handled by experts to ensure safety and compliance with electrical standards.
Main Panel Damage
If the main panel shows signs of damage or corrosion, professional inspection is necessary. Attempting repairs without expertise can be risky.
Lack Of Confidence Or Experience
Electrical work requires precision and knowledge. If the process feels uncertain, calling a professional is the safest choice.
Repeated Breaker Failures
If a new breaker fails quickly, it indicates a deeper issue. A licensed electrician can diagnose and fix the root cause effectively.
Frequently Asked Questions
1. Can I Learn How To Replace a Circuit Breaker Myself?
Yes, with proper safety precautions and tools, it is possible. However, beginners should proceed carefully and consider professional help if unsure.
2. How Do I Know When To Replace It?
Frequent tripping, overheating, or visible damage are clear indicators that replacement is needed.
3. How Long Does It Take To Replace a Breaker?
In most cases, replacing a breaker takes about 30 to 60 minutes if everything goes smoothly.
4. Is It Safe To Work Inside The Panel?
It is safe only after turning off the main power and verifying with a voltage tester. Some components may still remain live.
What This Means For Your Home Safety
Understanding how to replace a circuit breaker brings both confidence and control when dealing with electrical problems at home. Following the correct steps, prioritizing safety, and using the right tools can make the process smooth and effective. While simple replacements are manageable, knowing your limits and calling a professional when needed ensures long term safety and peace of mind.